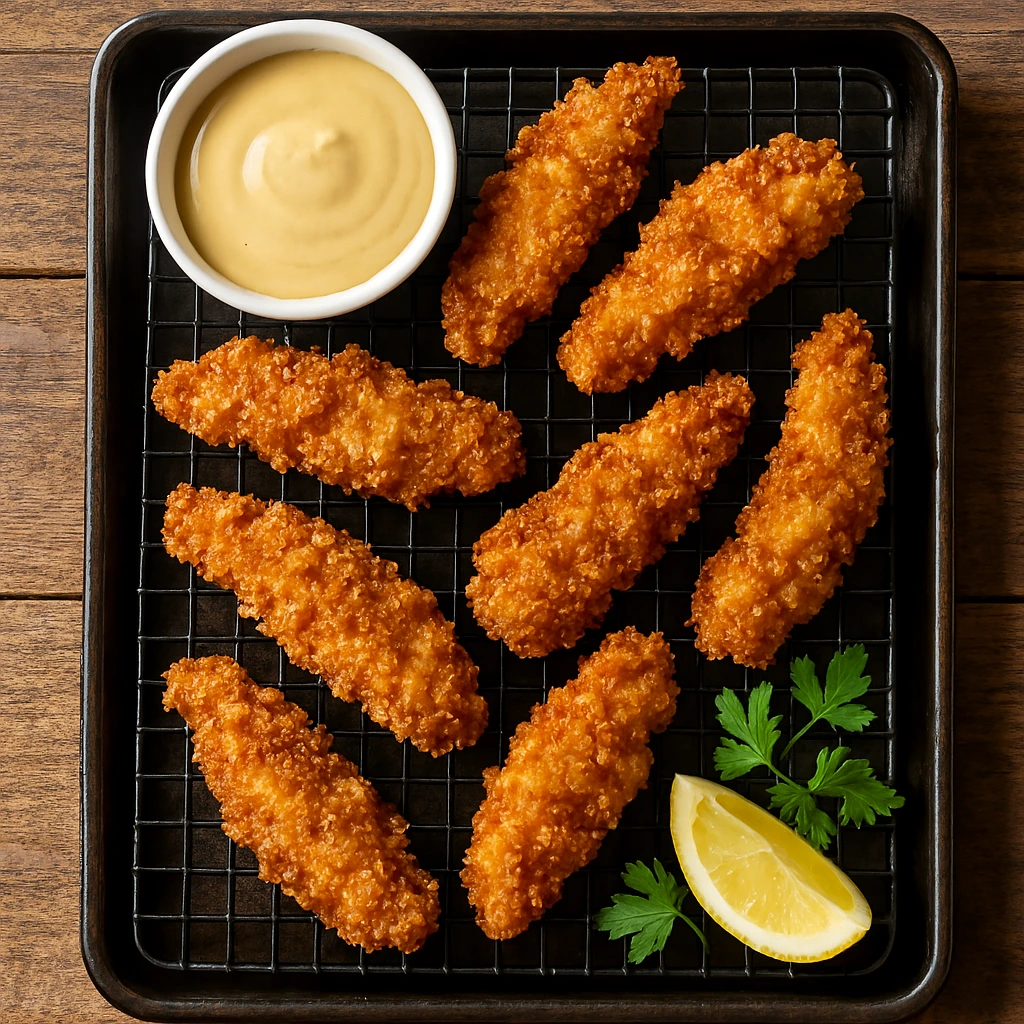
Every mother knows the “chicken tender struggle.” It is the one meal that almost every child agrees to eat, but the store-bought or fast-food versions are often loaded with mystery ingredients, excessive salt, and unhealthy fats.
If you are looking for healthy chicken tender recipes that satisfy that craving for a crispy, golden-brown crunch without the nutritional guilt, you have come to the right place. Homemade healthy chicken tenders are not only better for your body; they are budget-friendly, incredibly versatile, and can be whipped up in less time than it takes for a delivery driver to arrive at your door.
In this guide, we will explore why these tenders are a game-changer for your weekly meal plan and how you can make them perfectly every single time.
Why Choose Healthy Chicken Tenders?
When we talk about healthy chicken tender recipes, we are moving away from the deep fryer and toward nutrient-dense ingredients. Here is why making the switch is one of the best decisions for your family’s health:
- Lean Protein Power: Chicken breast or tenderloin is one of the best sources of lean protein. It helps children grow strong muscles and keeps adults feeling full and energized throughout the workday.
- Reduced Oil and Trans Fats: Fast-food tenders are submerged in industrial seed oils. By baking or air-frying your tenders at home, you reduce the fat content by up to 70% while keeping the flavor intact.
- Total Ingredient Control: You get to decide how much salt goes in. You can swap out white flour for whole-grain breadcrumbs or almond meal, and you can ensure there are no artificial preservatives or “fillers.”
- Versatility for Busy Lives: These aren’t just for dinner. They are the perfect addition to a school lunchbox (they taste great cold!), a topping for a fresh garden salad, or a quick high-protein snack after soccer practice.
Ingredients:
To make the best healthy chicken tender recipes, you need a solid foundation. Use this chart to plan your shopping list or find easy swaps based on what you already have in your pantry.
| Ingredient Name | Quantity | Healthy Alternative | Optional Substitutions |
|---|---|---|---|
| Chicken Tenders | 1.5 lbs (approx. 12-15 pieces) | Organic/Pasture-raised chicken | Chicken breast sliced into strips |
| Breading/Crust | 1.5 cups | Whole-wheat Panko or Almond meal | Crushed cornflakes or Oat flour |
| Binding Agent | 2 large eggs | Egg whites only or Greek yogurt | Flax egg (for vegan/allergy options) |
| Seasoning | 1 tsp each | Sea salt, Garlic powder, Paprika | Lemon pepper or Italian seasoning |
| Healthy Fat | 1-2 tbsp | Avocado oil spray or Olive oil | Melted coconut oil |
| Flavor Boost | 1/4 cup | Nutritional yeast (cheesy flavor) | Grated Parmesan cheese |
Kitchen Tools Needed
You don’t need a professional kitchen to make restaurant-quality tenders. Here are the basics:
- Large Baking Sheet: For oven-baking.
- Wire Cooling Rack: Placing this on top of the baking sheet allows air to circulate under the chicken, making it crispy on all sides.
- Shallow Bowls (3): For your “dredging station” (flour, egg, breadcrumbs).
- Air Fryer (Optional): The fastest way to get that “fried” texture with minimal oil.
- Meat Thermometer: To ensure the chicken is cooked perfectly to 165°F (74°C) without drying out.
- Tongs: To flip the chicken without losing the breading.
Step-by-Step Instructions
- Prep time: 15 minutes
- Cook time: 15-20 minutes
- Total time: 35 minutes
- Servings: 4 people
- Estimated Calories: 280 kcal per serving
Step 1: Prepare the Dredging Station
Set up three shallow bowls.
- Bowl 1: A light dusting of whole-wheat flour (helps the egg stick).
- Bowl 2: Whisk the eggs with a splash of water.
- Bowl 3: Combine your Panko breadcrumbs, garlic powder, paprika, salt, and pepper.
Step 2: Prep the Chicken
Pat the chicken tenders dry with a paper towel. This is a crucial “secret” step—if the chicken is wet, the coating will slide off!
Step 3: Bread the Tenders
Using one hand for “dry” and one for “wet,” dip a tender into the flour, then the egg, and finally press it firmly into the breadcrumb mixture. Ensure it is fully coated.
Step 4: Choose Your Cooking Method
Method A: The Oven-Baked Way
- Preheat your oven to 425°F (220°C).
- Place a wire rack over a baking sheet. Spray the rack with a little oil.
- Arrange tenders on the rack and give the tops a light spray of avocado oil.
- Bake for 15–18 minutes, flipping halfway through.
Method B: The Air Fryer Way
- Preheat the air fryer to 400°F (200°C).
- Place tenders in a single layer (do not crowd them!).
- Cook for 5–6 minutes per side until golden and crispy.
Method C: The Healthy Pan-Sear
- Heat a large non-stick skillet over medium-high heat with 1 tbsp of olive oil.
- Cook tenders for 4 minutes per side until the internal temperature reaches 165°F.
Tips for Making Crispy but Healthy Chicken Tenders
- The “Double Crisp” Hack: Toast your breadcrumbs in a dry pan for 2 minutes before breading the chicken. They will start golden and stay extra crunchy.
- Don’t Overcrowd: Whether in the oven or air fryer, if the pieces touch, they will steam instead of crisp. Give them space!
- Kid-Friendly Seasoning: If your kids are picky, stick to simple onion powder and a little Parmesan. If they like flavor, add a pinch of “Everything Bagel” seasoning.
- Safety First: Always wash your hands and surfaces after handling raw chicken to prevent cross-contamination.
Healthy Variations
We know that every family has different dietary needs. Here is how to adapt chicken tender recipes for everyone:
- The Gluten-Free Version: Use almond flour for the base and certified gluten-free Panko or crushed rice cereal for the crunch.
- The High-Protein Version: Replace breadcrumbs entirely with crushed pork rinds or a mixture of hemp seeds and parmesan cheese.
- The Dairy-Free Option: Simply omit the Parmesan cheese and use a dairy-free yogurt or egg wash for the binder.
- The Spicy Kick: Add 1/2 tsp of cayenne pepper to the breadcrumb mix or marinate the chicken in buffalo sauce before breading.
Serving Suggestions
Make it a complete, balanced meal with these ideas:
- For the Kids: Serve with “Healthy Honey Mustard” (Mix Greek yogurt, a teaspoon of honey, and a dash of mustard). Add carrot sticks and apple slices on the side.
- The Lunchbox Hero: Place cold tenders in a whole-wheat wrap with spinach, avocado, and a little light ranch dressing.
- The Dinner Delight: Serve over a bed of quinoa or alongside roasted sweet potato wedges and steamed broccoli.
- Dipping Sauces: Homemade salsa, sugar-free BBQ sauce, or a squeeze of fresh lemon juice are all great low-calorie options.
Storage and Reheating Tips
In the Fridge: Store leftovers in an airtight container for up to 3-4 days. In the Freezer: You can freeze these! Flash-freeze them on a tray first, then move to a freezer bag. They stay good for up to 3 months.
The Best Way to Reheat: Avoid the microwave if you want them to stay crispy. Instead, pop them back into the air fryer for 3 minutes at 350°F or in a toaster oven. This restores that fresh-cooked crunch perfectly.
FAQs
Can I make these ahead of time?
Absolutely. You can bread them and keep them in the fridge for up to 4 hours before cooking, or cook them and reheat as needed for meal prep.
What is the best chicken cut to use?
“Chicken tenderloins” (the small strip attached to the breast) are the most tender. However, slicing a standard chicken breast into strips is often more budget-friendly and works just as well.
How do I keep the breading from falling off?
Three things: Dry the chicken first, don’t skip the flour dusting, and let the breaded chicken “rest” for 5 minutes before cooking so the coating sets.
Conclusion
Finding healthy chicken tender recipes that the whole family loves doesn’t have to be a chore. By using lean protein, whole-grain coatings, and smart cooking methods like air-frying or baking, you can serve a meal that feels like a “cheat meal” but is actually packed with nutrition.
Whether you are a busy mother looking for a 20-minute dinner or a food lover wanting to meal-prep for the week, these tenders are sure to become a staple in your household. Give them a try tonight—your kids (and your body) will thank you!