Table of Contents
- Introduction
- Why Homemade Blackberry Jelly Beats Store-Bought Every Time
- Ingredients
- Classic Blackberry Jelly Recipe (With Pectin)
- Blackberry Jelly Without Pectin
- Canning Blackberry Jelly: Step-by-Step Guide
- Troubleshooting Common Jelly Problems
- Expert’s Opinion
- Frequently Asked Questions
- Conclusion
Why Homemade Blackberry Jelly Beats Store-Bought Every Time
There’s a reason homemade blackberry jelly has been a kitchen tradition for generations. Beyond the deeply satisfying process of making it, the result is categorically superior to anything in a jar at the grocery store:
- Intense, pure flavor: Homemade jelly contains nothing but fruit, sugar, and pectin — no artificial colors, no high-fructose corn syrup, no preservatives. The blackberry flavor is bold, authentic, and unmistakable.
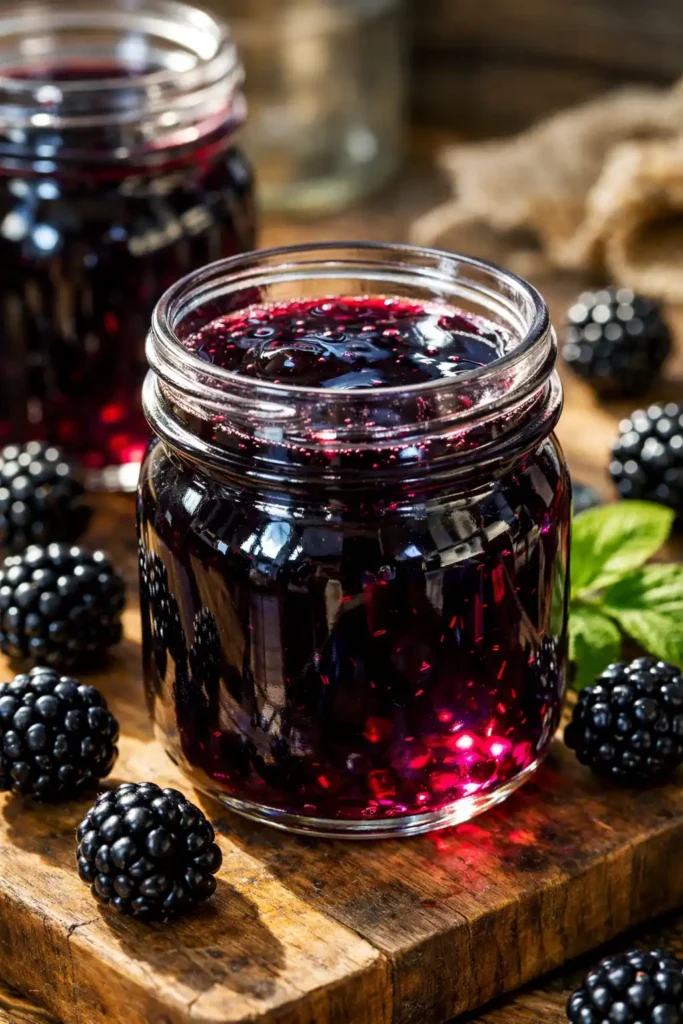
- Beautiful clarity: A properly strained seedless blackberry jelly achieves a gorgeous, jewel-like transparency that makes every jar look like a work of art.
- Customizable sweetness: You control exactly how much sugar goes in — make it tart and bold or sweet and jammy, completely on your own terms.
- Long shelf life: Properly processed canning blackberry jelly keeps for up to 12 months in a cool, dark pantry — making it one of the most practical preservation projects you can take on.
- Unbeatable gifting: A beautiful jar of homemade blackberry jelly tied with twine is one of the most thoughtful, personal gifts imaginable.
According to the National Center for Home Food Preservation’s guide to blackberry jelly, properly canned blackberry jelly stored in ideal conditions retains both quality and safety for a full year — making it a genuinely practical preservation investment. Want to explore more preserving projects? Check out our guide on homemade jam and jelly recipes for beginners.
Ingredients
Here’s everything you need for both the classic and no-pectin versions of this blackberry jelly recipe:
Ingredients Table — Classic Blackberry Jelly With Pectin
| Ingredient | Quantity | Notes |
|---|---|---|
| Fresh or frozen blackberries | 4 lbs (1.8kg) | Wild or cultivated both work |
| Granulated sugar | 5 cups (1kg) | Do not reduce — affects set |
| Powdered pectin | 1 packet (1.75oz/49g) | Sure-Jell or Ball brand recommended |
| Lemon juice (fresh) | 2 tbsp | Enhances flavor and aids set |
| Water | ¼ cup (60ml) | For initial berry cooking |
| Butter (optional) | ½ tsp | Reduces foam during cooking |
Ingredients Table — Blackberry Jelly Without Pectin
| Ingredient | Quantity | Notes |
|---|---|---|
| Fresh blackberries | 4 lbs (1.8kg) | Slightly underripe berries have more natural pectin |
| Granulated sugar | 3–4 cups (600–800g) | Adjust to taste after measuring juice |
| Fresh lemon juice | 3 tbsp | Critical for natural set without pectin |
| Water | ½ cup (120ml) | — |
Equipment needed: Large heavy-bottomed pot, jelly bag or fine mesh strainer lined with cheesecloth, canning jars with lids, jar lifter, candy thermometer, and large ladle.
Classic Blackberry Jelly Recipe (With Pectin)
This is the most reliable method for a perfectly set blackberry jelly with pectin — consistent results every single time, even for first-time jelly makers.
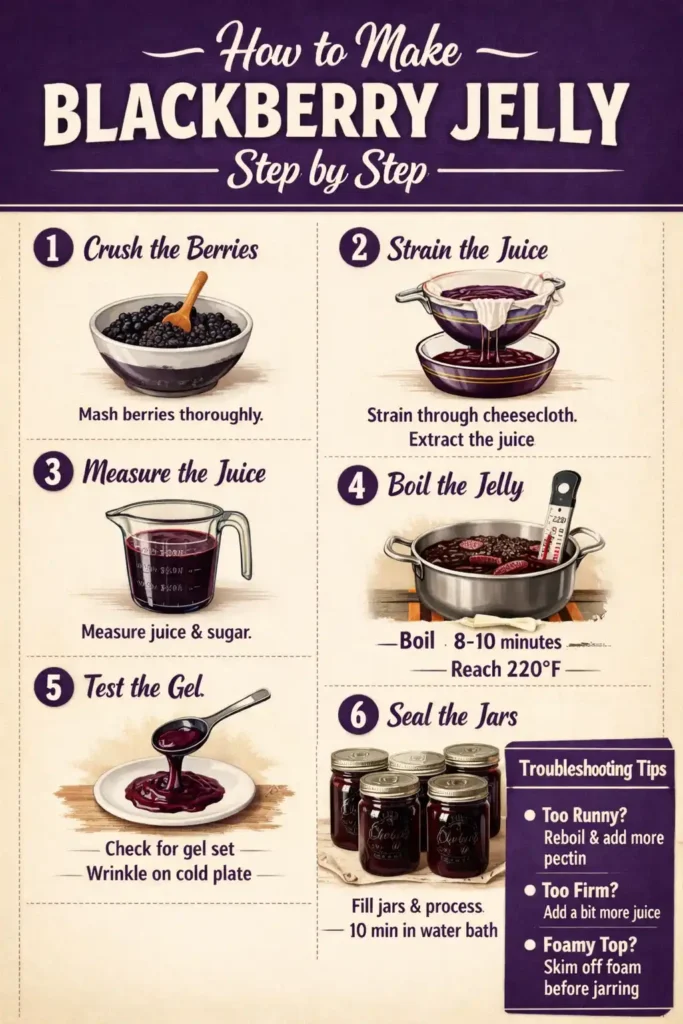
Step 1: Extract the Blackberry Juice
- Rinse blackberries thoroughly and place in a large pot with ¼ cup water.
- Crush berries with a potato masher as they heat over medium heat.
- Bring to a boil, then reduce heat and simmer for 10 minutes, stirring occasionally.
- Pour the cooked berry mixture into a jelly bag or a fine-mesh strainer lined with several layers of cheesecloth set over a large bowl.
- Let the juice drip through for at least 2 hours — or overnight in the refrigerator for maximum yield. Do not squeeze the bag — pressing forces pulp through and makes your jelly cloudy rather than clear.
- Measure your extracted juice — you need exactly 4 cups (960ml) for this recipe. Add water if slightly short.
Step 2: Cook the Jelly
- Combine blackberry juice, lemon juice, and powdered pectin in a large pot. Add butter if using.
- Bring to a full rolling boil over high heat — one that cannot be stirred down — stirring constantly.
- Add all the sugar at once. Return to a full rolling boil and boil hard for exactly 1 minute, stirring constantly.
- Remove from heat. Skim any foam from the surface with a metal spoon.
Step 3: Jar and Process
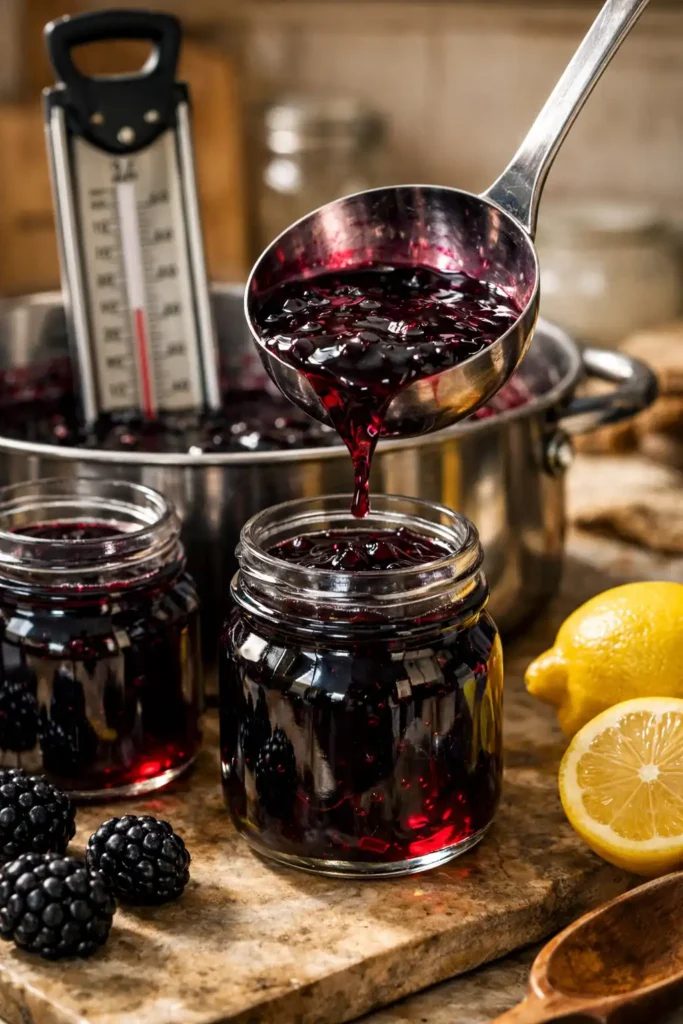
- Ladle hot jelly immediately into sterilized jars, leaving ¼ inch headspace.
- Wipe jar rims clean with a damp cloth. Apply lids and bands fingertip-tight.
- Process in a boiling water bath canner for 10 minutes (adjust for altitude if needed).
- Remove jars and let cool undisturbed on a towel for 12–24 hours. Listen for the satisfying “ping” as lids seal.
- Check seals after cooling — properly sealed lids will not flex when pressed in the center.
Yield: approximately 6–7 half-pint (8oz) jars
Blackberry Jelly Without Pectin
Making blackberry jelly without pectin relies on the fruit’s natural pectin content and a longer cooking time to achieve the set. The result has a slightly softer set and a more intensely concentrated blackberry flavor — many jelly purists prefer it.
- Extract juice using the same method as above. Measure 4 cups of juice.
- Combine juice and lemon juice in a heavy pot. For every cup of juice, add ¾ cup sugar. Stir well.
- Bring to a boil over high heat, stirring to dissolve sugar.
- Continue boiling, stirring frequently, until the mixture reaches 220°F (104°C) on a candy thermometer — the gel point.
- Alternatively, test the set using the cold plate method: place a small plate in the freezer. Drop a teaspoon of jelly on the cold plate and push it with your finger after 30 seconds. If it wrinkles and holds its shape, it’s ready. If it runs, keep cooking.
- Skim foam, jar, and process exactly as described in the classic method above.
Note: The no-pectin method typically takes 25–40 minutes of active boiling to reach the gel point and reduces the yield slightly due to evaporation.
Canning Blackberry Jelly: Essential Tips for Safe Preservation
Proper canning blackberry jelly technique is what transforms a great recipe into shelf-stable preserves that last up to a year. Follow these non-negotiable guidelines:
Sterilizing Your Jars
Wash jars, lids, and bands in hot soapy water. Place jars in your canner, cover with water, and boil for 10 minutes. Keep jars hot until ready to fill — never pour hot jelly into cold jars as thermal shock can cause cracking.
Altitude Adjustments
- 0–1,000 ft: Process for 10 minutes
- 1,001–6,000 ft: Process for 15 minutes
- Above 6,000 ft: Process for 20 minutes
Checking Seals
After 24 hours of cooling, press the center of each lid. A properly sealed jar will be concave and firm — it will not flex. Any jar that didn’t seal properly should be refrigerated and used within 3 weeks.
Troubleshooting Common Blackberry Jelly Problems
My Jelly Didn’t Set
The most common cause is insufficient boiling time or inaccurate measurement of juice or sugar. You can re-process runny jelly — simply re-boil with a small amount of additional pectin and sugar following the remake instructions on your pectin packet.
My Jelly Is Cloudy
Cloudiness usually results from squeezing the jelly bag during straining, using underripe or overripe fruit, or cooking the berries too vigorously. Always let juice drip naturally and never rush the straining process.
My Jelly Has Foam on Top
Foam is completely normal and harmless. Skim it off with a metal spoon just before ladling into jars. Adding ½ tsp of butter to the pot before boiling significantly reduces foam formation.
My Jelly Is Too Dark
Overcooking causes darkening and can also affect flavor. Use a candy thermometer to hit the precise gel point and remove from heat immediately. Work quickly when ladling into jars.
My Expert Opinion on the Perfect Blackberry Jelly Recipe
After years of making blackberry jelly recipes in every possible variation, here’s my most valuable — and least expected — piece of advice: use a mix of slightly underripe and fully ripe blackberries. Fully ripe berries deliver maximum flavor and sweetness, but underripe berries contain significantly more natural pectin. Combining roughly 20% underripe with 80% fully ripe berries gives you the best of both worlds — deep, complex flavor AND a reliable natural set, even in the no-pectin method. It’s the secret that professional preservers have used for generations, and it makes a tangible difference in every jar.
My other non-negotiable recommendation? Never rush the straining step. I know it’s tempting to squeeze that jelly bag when the juice is dripping slowly, but patience here is absolutely everything. A naturally dripped juice produces a seedless blackberry jelly with crystal-clear, jewel-like clarity that is genuinely beautiful. The moment you squeeze, you introduce pulp and tannins that cloud the jelly permanently — there’s no fixing it after the fact. Set it up before bed, let it drip overnight, and wake up to perfect juice ready to transform into something extraordinary.
FAQs
Q: Can I use frozen blackberries for this blackberry jelly recipe?
Yes — frozen blackberries work beautifully and are available year-round, making this recipe accessible in any season. Thaw completely before cooking and include all the accumulated juice from thawing. Frozen berries have often been picked at peak ripeness, meaning excellent flavor and good natural pectin content.
Q: How long does homemade blackberry jelly last?
Properly sealed and processed canning blackberry jelly keeps for up to 12 months stored in a cool, dark pantry. Once opened, refrigerate and use within 3–4 weeks. Unsealed jars should be refrigerated immediately and used within 3 weeks.
Q: Why do I need to add lemon juice to my blackberry jelly?
Fresh lemon juice serves two critical functions. First, it provides additional acidity that helps pectin activate properly and achieve a firmer set. Second, it brightens and balances the deep sweetness of the blackberries, producing a more complex, vibrant flavor. It also acts as a natural preservative. Never skip it — the difference in both set and flavor is significant.
Q: Can I reduce the sugar in a blackberry jelly recipe?
With standard pectin, do not reduce the sugar — the ratio of sugar to fruit juice is precisely calibrated to achieve the correct set. Reducing sugar produces jelly that won’t set properly. If you want a lower-sugar option, use a low-sugar or no-sugar pectin specifically formulated for reduced-sugar recipes, such as Sure-Jell’s pink box version. These are widely available and produce excellent results with significantly less sugar. For detailed guidance on safe canning practices, visit the National Center for Home Food Preservation.
Conclusion
A homemade blackberry jelly recipe is one of those timeless kitchen projects that rewards every minute of effort with something genuinely beautiful and delicious. Whether you choose the reliable blackberry jelly with pectin method for consistent results or the traditional blackberry jelly without pectin approach for a more concentrated flavor, the fundamentals in this guide give you everything you need to succeed from your very first batch.
Start with the classic pectin method if you’re new to jelly making — it’s forgiving, fast, and produces a stunning result. Once you’re confident, try the no-pectin version for that deep, old-fashioned flavor that truly cannot be replicated. Either way, your pantry shelf — and everyone lucky enough to receive a jar — is about to look a whole lot better. Explore more preserving projects in our collection of homemade canning and preserving recipes.